Motivation

No matter what programming language you’re using, sometimes you get itch to map a whole collection to another. Usually, you do things like:

val list = (1 to 6) toList
list.map(_ * 2)

or in C#:

List<int> list = new List<int>{ 1, 2, 3, 4, 5, 6 };
List<int> mappedList = list.Select(x => x * 2);

or like in Python:

l = [1, 2, 3, 4, 5, 6]
mapped_list = map(lambda x: x * 2, l)

The main problem with above codes is that when the size of the collection grows, or the mapping itself becomes more complex, this operation will be very time-take. And that is because those codes are running in one thread.

Since all the items in the collection are mapped in the same way, why don’t we just put them onto threads and let them to be done seperatly?

Go Parallel

Parallel operations on collections is very easy in popular languages. The operation like this in most language will allow system to distribute thread resource according to the current status of CPU, and how much the task is, which could be extremely overwhelming if we write it our own.

usecase: To make it more practical, let’s say we want to download all the images based on a list, which contains 10000 urls of those images.

C#

To download these images, it could be a little complex in C#. C# has a foreach key word used to make list traversal like this:

foreach (String item in strList)
{
    // ...    
}

to do that in parallel way, we use the parallel version of foreach, like this:

using System;
using System.Net;
using System.Drawing; // requires system.Drawing.dll 
using System.IO;
using System.Threading;
using System.Threading.Tasks;
using System.Collections.Concurrent;

class SimpleForEach
{
    static void Main()
    {
        // A simple source for demonstration purposes. Modify this path as necessary. 
        List<string> strList = LoadStrings();
        ConcurrentBag<string> destList = new ConcurrentBag<string>();
        //  Method signature: Parallel.ForEach(IEnumerable<TSource> source, Action<TSource> body)
        Parallel.ForEach(strList, str =>
        {
            // do some modification
            string changedString = ChangeString(str);
            destList.add(changedString);
        });
    }

    static List<String> LoadStrings()
    {
        // get a batch of strings here

    }

    static string ChangeString(string org)
    {
        // change the string as dest
        return dest;
    }


}

One thing you should be careful about is that in C# you can not map collections directly. You will have to put all the items in a parallel version of list, which is ConcurrentBag here, and it is thread safe. You can refer to another way by using ParallelLoopResult.

Python

Things could be even more easier in Python:

from multiprocessing import Queue
from multiprocessing import Pool

def downloadImage(url):
  # download image with the url
  return img

strs = [...]

pool = Pool(20) # define how much parallelism you want
results = pool.map(mapString, strs)
pool.close()
pool.join()

Please make sure you have imported the right library of pool.

scala

In scala, it is super easy to do the same thing, and you literally only one line to do that:

strList.par.map(downloadUrl(_))

And done!

Of course you can define your own function to modify the string, but be sure this function is thread safe.

References

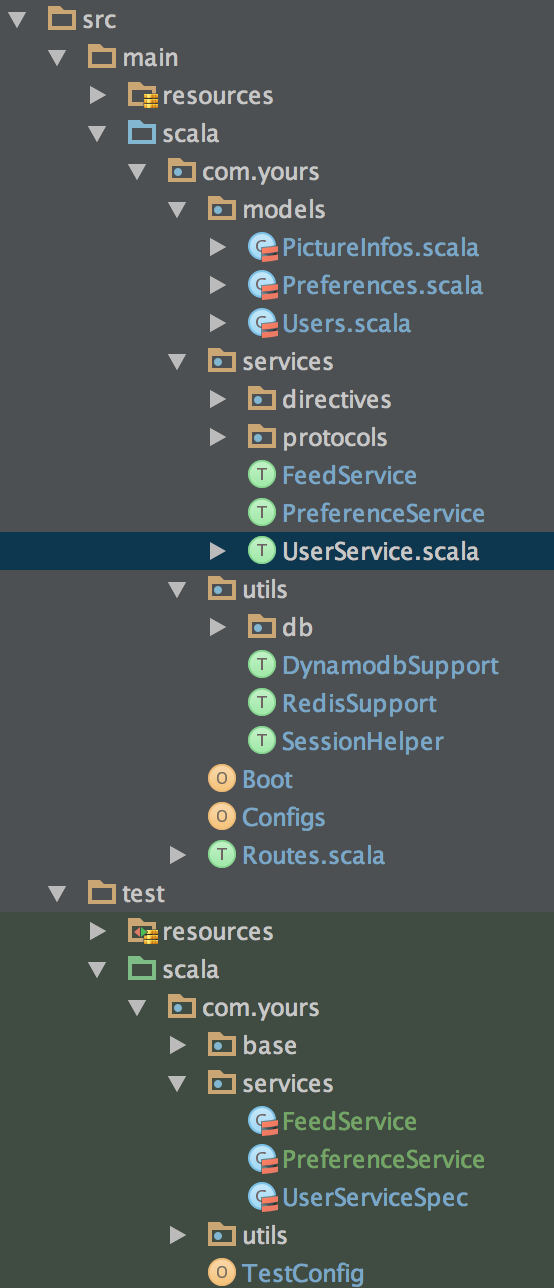
Spray is an elegant Framework in many ways. Here is my opinion on how to arrange your controllers(actions) in your projects, so that you can easily maintain them and test them.

Project structure

UserService_scala_-__badboy-api__-_badboy-api_-____Documents_projects_badboy-api_.png

My Spray project structure.

Controllers

You will find that I didn’t use class to extend Actor. I only use trait in these files.

package com.yours.services

import spray.routing._
import spray.http._

// this trait defines our service behavior independently from the service actor
trait PreferenceService extends HttpService {
  val preferenceRoute =
    path("prefer") {
      get {
        complete("ok")
      }
    }
}
package com.yours.services

import spray.routing._
import spray.http._

// this trait defines our service behavior independently from the service actor
trait PreferenceService extends HttpService {
  val preferenceRoute =
    path("prefer") {
      get {
        complete("ok")
      }
    }
}

Routes

Here is your route actor, which will combine all the controller traits.

package com.yours

import akka.actor.{ActorRefFactory, Actor}
import com.yours.services.{UserService, FeedService, PreferenceService}

/**
 * Created by visualskyrim on 12/25/14.
 */
class RoutesActor extends Actor with Routes {
  override val actorRefFactory: ActorRefFactory = context
  //def receive = runRoute(boyRoute ~ feedRoute ~ preferenceRoute)
  def receive = runRoute(routes)
}

trait Routes extends UserService with FeedService with PreferenceService {
  val routes = {
    userRoute ~
    feedRoute ~
    preferenceRoute
  }
}

Boot

This part is like Global in Play framework, used to start your application. We launch our route actor here.

import akka.actor.{ActorSystem, Props}
import akka.io.IO
import com.yours.utils.db.DbSupport
import com.yours.RoutesActor
import spray.can.Http
import akka.pattern.ask
import akka.util.Timeout
import scala.concurrent.duration._

import com.yours.utils.DynamodbSupport

object Boot extends App with DbSupport with DynamodbSupport {
  implicit val system = ActorSystem("your-api")

  val service = system.actorOf(Props[RoutesActor], "your-service")

  implicit val timeout = Timeout(5.seconds)
  IO(Http) ? Http.Bind(service, interface = "localhost", port = 8080)
  // initialize the helpers
  // initialize the Db
  initTables()
  initDynamoDbTables()
}

Benefits

I believe this arrangement fits most cases.

  • Most people would like request handler to be separated in several files, grouping the controllers according to the related features. If people want to change anything or add anything, they can easily locate the place.
  • It’s clean. There will be no association with the Akka system in the middle of your real logic.
  • You might have noticed that since we use trait to build controllers, we can test our controllers without getting hands dirty with Akka.

Filter is a very useful concept in scala version of Play Framework.

It can allow you to do some general process to the requests before and after they are passed to controller, which also allows you to get access to the context of requests before and after processed by controller.

However, the Filter for Java version is not, well, so useful.

You can compare Filter of these two kinds in the Doc.

Luckily, PlayFramework for Java is actually a wrapper on the scala’s PlayFramework. So there is still a way to use scala version’s Filter in Java’s PlayFramework.

I will show how to achieve this by trying use Filter to record the process time of requests.

To use scala’s filter in Java’s PlayFramework, we need first to wrap it:

package filters.JavaFilter;

import play.api.mvc.*;

public abstract class JavaFilter implements Filter {
    public void $init$() {
        Filter$class.$init$(this);
    }

    @Override
    public EssentialAction apply(EssentialAction next) {
        return Filter$class.apply(this, next);
    }
}

Note that interacting with scala library in Java is not really clean.

Then we could use this wrapped filter in our code:

package filters.JavaFilter;

import play.api.Logger;
import play.api.libs.concurrent.Execution$;
import play.api.mvc.RequestHeader;
import play.api.mvc.ResponseHeader;
import play.api.mvc.Result;
import scala.Function1;
import scala.Option;
import scala.concurrent.Future;
import scala.runtime.AbstractFunction0;
import scala.runtime.AbstractFunction1;

public class RecordProcessTimeFilter extends JavaFilter {

    private final Logger logger = Logger.apply("process_time");

    @Override
    public Future<Result> apply(
                                  Function1<RequestHeader, Future<Result>> next,
                                  RequestHeader rh) {

        // you can access the context before the request is processed
        final long start = System.currentTimeMillis();

        return next.apply(rh).map(new AbstractFunction1<Result, Result>() {
            @Override
            public Result apply(Result result) {
                // you can access the context after request is processed here
                final long end = System.currentTimeMillis();
                final int status = result.header().status();

                // record in the log
                logger.info(new AbstractFunction0<String>() {
                    @Override
                    public String apply() {
                        // you can only access the start here
                        return "%d - %d".format(status, end - start)
                    }
                });

                // pass the result to the next filter
                return new Result(
                    new ResponseHeader(status, result.header().headers()),
                    result.body(),
                    result.connection());
            }
        }, Execution$.MODULE$.defaultContext());
    }
}

As you can see, you can access to the context before request is processed in RecordProcessTimeFilter.apply(). You can get the time before request is processed.

And you can access to the context after request is processed within the block under return next.apply(rh).map(new AbstractFunction1<Result, Result>(){}. Note you can only access to the variable start you stored via an AbstractFunction0 in the context when request is processed.

There are many other use cases for Filter:

  • Modify the http headers in the response after request is processed for all request to solve Cors problems.
  • Check and modify Content-Type in the request before the request is processed.

REF

[1] - Locust document


はじめで日本語で書きます。よろしくお願いします!


負荷試験の難しさ

  • 一つのThreadで、Requestを送信するのは遅い。
  • 複数のThreadでRequestを送信しても、一つのサーバー(パソコン)の性能は限界がある。
  • 負荷の指定するのは難しい。
  • ResponseTimeの統計はめんどい。(二番目を解決するため、複数サーバーが負荷をかけるともっとめんどくなる)
  • Responseの内容をチェックしたいんですが、チェックするとRequestを送信するのが遅くなる。バランスが取りにくい。
  • 自分でそんな負荷試験プログラム書きたくない。

Locustは以上の全ての問題を解決できます。

Locustの基本機能

Locustでは、何個ユーザー(client)、どうの頻度でどうのrequestが送信するのを設定できます。そして、実行している時現時点の秒間リクエスト数や、各リクエストの送信回数と平均・最大・最小ResponseTimeや、失敗したリクエストを表示することができます。

LocustのInstall

pipとeasy_installでinstallするのは一番やりやすい方法です:

pip install locustio
easy_install locustio

WindowsとMacのInstall方法はこちらに参考してください。

Locustを起動する

Locustでの負荷試験は簡単です。 負荷試験を起動する必要なものは一つのpythonのTestCaseです。 LocustのTestCaseも書きやすいです。以下は典型的な例の一つ:

from locust import HttpLocust, TaskSet, task

# 本物のTestCase前に、Test用の資料を用意します
textureDirName = "texture"
userIdFileName = "user_id.txt"
userIdFilePath = os.path.join(os.path.abspath(os.path.dirname(__file__)), textureDirName, userIdFileName)

globalUserArr = list(line.rstrip('\n') for line in open(playerIdFilePath))

class SimpleTaskSet(TaskSet):

  # テスト起動する時invokeするメソード
  def on_start(self):
    randomIndex = random.randint(0, len(globalUserArr) - 1)
    self.testingUserId = globalUserArr[randomIndex]

  # test case 1
  @task(1)
  def testRequestGet(self):
    # urlのpathの部分を作成
    requestPath = "/services/users/" + self.testingUserId + "/checkSomeThing"
    # requestを送信
    self.client.get(requestPath)

  # test case 2
  # @task(2) が指定して、このtest caseの送信頻度を上のtest case 1の二倍になる。
  @task(2)
  def testRequestPost(self):
    requestPath = "/services/users/doSomeThing/checkin"
    # Post requestの読み方
    self.client.post(requestPath, {"user": self.testingUserId })

# Locustのclass
class SimpleLocust(HttpLocust):
  task_set = ReadStateTaskSet # 上のtest caseをimportします
  # 各ユーザーが前回のrequestを送信した後、何秒を待つかという設定
  min_wait = int(1)
  max_wait = int(2)

 一つの注意点があります。 ListDictのようなMemberがTaskSetに入らない方がいいと思います。

そして、

python -H [you_url_or_ip_of_your_application] -f [path_of_your_SimpleTask]

を実行しで、Localhostの8089Portで負荷試験Consoleを訪問できます。そこで負荷が設定して試験を始めます。

Distributedでの負荷試験

Locustを使ったら、分散型負荷試験がやりやすいです。

まず複数のサーバーを用意して、そしてさきのscriptをサーバーにUploadします。

一つのサーバーは Master を担当し、他のサーバーが Slave になる。 Master が設定した負荷を Slave に配分して、 Slave がリクエストを送信します。

masterで:

python -H [you_url_or_ip_of_your_application] -f [path_of_your_simple] --master

slaveで:

python -H [you_url_or_ip_of_your_application] -f [path_of_your_simple] --slave --master-port=[master_ip]

 分散型負荷試験をやる時、3つの注意点がある:

 1. MasterとSlaveと通信があるので、FirewallやSecurityGroupを設定しないといけない。

 2. 重い負荷をテストするとHealthCheckなどのため、同時でたくさんファイルがOpenするから、Ulimitを超えるかも。だから、MasterとSlaveの各サーバーで、Locustを起動する前にulimit 4096をさきに実行します。

 3. Defaultの8089のportを変更したいなら、Masterで--master-bind-port=5557のように追加して、Slaveで--master-port=5557を追加します。

REF:


Add depencency

In build.sbt for both your Play API and akka actor program, add akka’s remoting lib, because this is not included in akka’s main lib.

libraryDependencies ++= Seq(
  // ... other libs
  "com.typesafe.akka" %% "akka-remote" % "2.3.4"
)

```

(Re)Config akka

For API

For Play API, change the default akka settings in your conf/application.conf like following:

akka {
  actor {
    provider = "akka.remote.RemoteActorRefProvider" # offer the provider
  }

  remote {
    enabled-transports = ["akka.remote.netty.tcp"] # enable protocol
    netty.tcp {
      hostname = "127.0.0.1" # your host
      port = 2553 # port
    }
  }
}

If there is no akka object in your config file, you could just add above to the config file.

For Actor

Almost do the same thing as you did in API in your src/main/resources/application.conf.

yourSystem { # the name your actor system is going to use
  akka {
    # other thing is just the same as that in API
    loglevel = "DEBUG"
    loggers = ["akka.event.slf4j.Slf4jLogger"]

    actor {
      provider = "akka.remote.RemoteActorRefProvider"

      default-dispatcher {
      }
    }

    remote {
      enabled-transports = ["akka.remote.netty.tcp"]
      netty.tcp {
        hostname = "127.0.0.1"
        port = 2552 # Note if you are running API and Actor program in localhost, make sure they are not using the same port
      }
    }
  }
}

Then apply the settings in your code:

// ... some codes for launch the program
val system = ActorSystem("CoolSystem",config.getConfig("yourSystem")) // you will see this below

Note The provider shown above changes over versions of akka, check your version carefully and choose the right provider.

Program

API

I use Play in Java for this example. For Scala, see this.

In your controller(action), connect your remote actor using:

public static F.Promise<Result> askYourActorSomething(final String info) {
    String actorPath = actorHelper.getPath(); // get akka path of your worker, this will not show in my example
    ActorSelection actor = Akka.system().actorSelection(actorPath); // get actor ref
    return play.libs.F.Promise.wrap(ask(actor, new MessageToActor(info), 5000)).map( // use ask pattern so that we can get sync response from actor; wrap into Promise
        new F.Function<Object, Result>() { // the callback when actor sends back response
            public Result apply(Object resp) {
                return ok((String) resp);
            }
        }
    );
}

The main point here is that if you use ask pattern in your code, you have to wrap your result into Promise.

Actor

Actor code:

class Worker extends Actor {
  override def receive = {
    case MessageToActor(info) => // get message from API
      sender ! "worked!" //  response to API
  }
}

Launch code:

// fetch configs
val remoteConfig = ConfigFactory.load.config.getConfig("yourSystem").getConfig("akka").getConfig("remote").getConfig("netty.tcp")
val actorHost = remoteConfig.getString("hostname")
val actorPort = remoteConfig.getInt("port")
val workerName = "worker"

val actorPath = "akka.tcp://" + "yourSystem" + "@" + actorHost + ":" + actorPort + "/user/" + workerName
println(actorPath) // here you know what your actor's path is, well, just for show, don't do this sort of thing your code.
val system = ActorSystem("CoolSystem",config.getConfig("yourSystem"))
val actor = system.actorOf((new Worker()), name = workerName)

Now, if the controller askYourActorSomething is called, it will send a message to your actor, which is specified by your path. Then the actor receives this message and send a String back to the API controller, which consequently cause API return “worked!”.

There is a one more thing

If you are gonna use remote actor in Play application in Production, especially in distributed environment, things are going to be a little bit tough.

Firewall

This will cause it impossible to API and Actor program access to each other.

If you are using EC2, this could be solved by setting security groups. You must make sure the API and Actor program is in each other’s group’s inbound.

Pass path to the API

It seems very easy in the first sight, you can just put the actor path in the a database table by overriding actor’s preStart method. Programatically, the API will never know the remote actor it is asking for is still working or already dead. Even if you change the record in your table when the actor is not accessible any more by overriding the postStop of Actor, this method can hardly be called in real situation.